Showing posts with label Ikea. Show all posts

April 12, 2011

More Free Downloadable Artwork


I've been seeing a lot of symmetrical geometric prints framed and hung in groups.  People are especially loving this set of 6 from Crate & Barrel:

Others find that $ 369 is just too much to spend right now, and have been going about getting a similar look in more creative ways, such as framing 60-cent pieces of colored craft paper in Ikea frames:


But I just discovered Sprik Space, where the wonderful Aimee offers free downloads of geometric patterns in several different colors.  


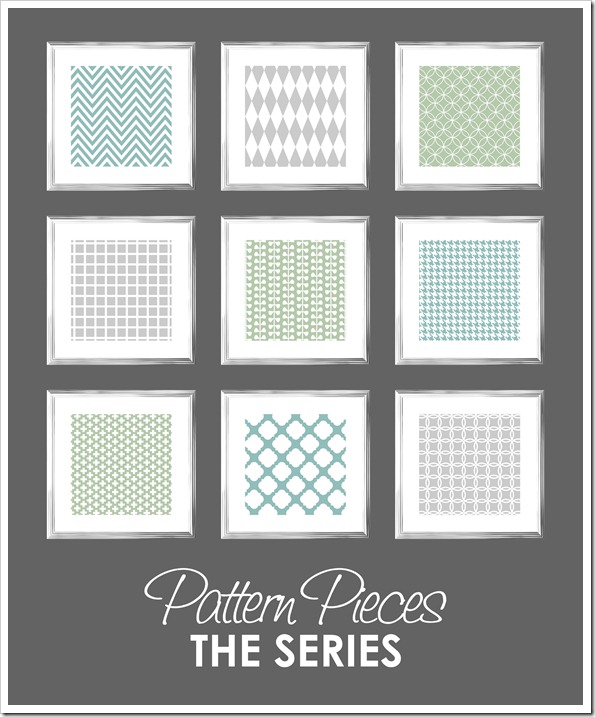
The patterns she offers include Circles, Leaves, Grid, Chevron, Diamonds, Houndstooth, and more.

She then recommends getting them printed on 12"x12" size from Costco for $ 2.99 each, and framing them in Ikea Ribba square frames at $ 17.99 each.   If you follow these instructions, a set of 6 costs only $ 125.88!

She also offers other great downloads in various color options, great for nurseries, gallery walls, craft rooms, etc.  Just a few examples below:


See more at Sprik Space, under the Freebies tab!

See an earlier post for more downloadable artwork from Feed Your Soul.

November 20, 2010

DIY Inexpensive Credenza


Anna over at Door Sixteen recently unveiled her "fauxdenza" (her words, not mine), and I love it.  She used 3 Ikea Akrum wall cabinets at $52 each.  It's a clean look that doesn't take up any floor space, and will cost much less than any furniture pieces you'll find out there (unless you find an amazing craig's list deal or undertake a much larger and more time-consuming DIY project).  Yes, it's Ikea (someday I promise I'll post about all my research comparing Ikea cabinets to other cabinet lines), and you have to assemble it yourself, but if you're in a pinch and you need some extra storage / display space, it's a great option.

Note that the wall cabinets do not have finished tops, which is why she has a table runner (temporary).  A wood top would look great, or maybe a back-painted glass  (I've always wondered if I could do a good job of painting glass myself, though I think it would be tough to make it look just right)?

What do you think?

P.S.  Isn't the ampersand fun?  And the Eames-like rocker?  Oh, and I have those same candlesticks in my dining room (yes, also Ikea)

September 22, 2010

Laundry Closet Project


Unfortunately our laundry "room" is a closet in our kitchen.  The closet was likely originally just a closet, because our small washer & dryer are still too deep to allow standard doors on the closet.  Someday we'd like to custom-design sliding doors to sit proud of the closet, but for now, while it's still exposed, I just wanted to make it look a little less like a closet.

Here's what it looked like when we bought the house:

And this was our first quick-fix (really really quick fix) so we could fit our stackable units in:

And here's what it looks like now, after a couple weekends of work:
The cabinet, shelf, and drying rack are from Ikea.  The pulls are Riva from Amerock.  The apron is a gift from my mom via etsy, using Amy Butler fabric.  The yellow/green print is a gift from my brother, also from etsy, by Katie Kirk (her etsy shop is closing soon but check it out here while you still can!).  My handy boyfriend made the countertop for me using leftover laminate from our kitchen countertop project.

All of the cleaning, laundry, and dog supplies are hidden behind doors or in the storage baskets.  So much better, right?


July 15, 2010

SemiHandmade Cabinetry


Someday I might kick myself for posting about this, because I'm in the cabinet business, and a majority of my income comes from selling cabinets.  But I'm really intrigued by this concept.  

Many of us are familiar with the term "refacing", and many of us in the industry cringe when we hear it.  In the world of kitchen and bath design, refacing means keeping existing cabinets and replacing the doors, to give the illusion of a new kitchen.  It sounds easy enough, right?  The problem with this process is that to do it right can be very labor intensive (both in the planning and the installation), and you don't have flexibility to change the layout.  In the end, you still end up spending a lot of money, and beneath the pretty new finishes you have the same old kitchen. 


The SemiHandmade line by John McDonald is interesting because it falls somewhere in between refacing and replacing cabinetry.  It starts with mass-produced cabinet boxes, mainly from Ikea.  But rather than using Ikea door and drawer fronts, he makes custom fronts in beautiful materials such as teak, walnut, douglas fir, etc... beautiful options you'd never find at Ikea.   


This appeals to me because (gasp!) I don't think Ikea boxes are really that bad.  I know.  I said it.  Don't get me wrong.  They're not great.  They won't hold up as well as the more expensive options, but.... they're not THAT bad.  And the drawer systems are actually pretty decent.  The idea of putting custom non-Ikea fronts on these bases makes me wonder...  It's less bothersome than refacing, because you can tweak the design and take advantage of modern door/drawer technology, as well as new appliance options that may not fit in older kitchen cabinetry.


To be clear, I'm not considering buying all my boxes from Ikea from now on.  But it's just nice to know there's another alternative that just might be worth considering for my budget-conscious clients who might need a new direction and still want a personal custom touch.


I'm guessing there's not much of a warranty though.  I'm pretty sure the custom shops I work with would void all warranties if they knew their products were going to touch something from Ikea.  


February 22, 2010

Ikea Hack (sorta)

What do you get when you combine an Ikea Utby table base (similar to this, though no longer available in square) with a few random leftover cabinet doors found in the basement of a kitchen showroom?
 + 

You get this awesome pub height table!


We (okay Mike) worked on it all weekend.  We (again, Mike) cut the doors to form the square, then used the cut pieces plus strips from the 3rd door to give the top the appearance of extra thickness.  Then we (yep, Mike) cut 2 layers of 3/4" plywood to use as the base.  For what it's worth, I got the doors and drew the plans on CAD.  But obviously Mike did all the hard work.  I just get to sit and admire it.  Next step:  barstools and something to hang on the wall above the table.  And new blinds / window treatments.  The list never ends.