January 30, 2012

DIY Sunburst Mirrors


My talented friend Rebecca (whose nursery you've seen before here) has been busy at work on her Living Room redo.  (Hopefully I'll get to post the whole room before & after once the finishing touches are done.)  Part of this redo includes an incredible sunburst mirror that SHE MADE HERSELF using wood shims!   She said she was inspired by a project she had seen online, so after seeing her mirror, I wanted to see what others had done.  It looks amazing, and cost far less than what you would spend if buying a mirror of that size from any retail store.

Here's how Rebecca did it:

Materials:
  • 12" cedar shims
  • Hot glue gun
  • 12" wood wreath frame (from Michael's)
  • Larger diameter wood frame (cut by her husband) for extra stability
  • Low-gloss tongue oil
  • Foam brush
  • 14" round mirror (from Michael's)
  • Mirror mastic
  • heavy-duty hanging bracket

  1. Glue the shims together with hot glue, in sections of 6, with the ends staggered.
  2. Glue the sections together to form a full circle (again using hot glue).
  3. Glue the 12" wood wreath frame to the back of the shim frame, using wood glue (with dabs of hot glue to help hold it in place while the wood glue dries).
  4. Do the same with the larger wood frame.
  5. Allow to dry (she put a lot of weight on it and let it sit flat for 24 hours).
  6. Once dry, apply 2 coats of low-gloss tongue oil with a foam brush (she didn't do any sanding between coats) to bring out the natural wood tones of the cedar.
  7. After the tongue oil is dry, attach the mirror to the front side of the shim frame, using mirror mastic.  (Use a lot of mirror mastic, since the shims are not even, and therefore you want to make sure there's enough mastic to fill any gaps so it still touches the surface of the mirror in as many places as possible.)
  8. Again, sit flat, add weight, and allow to dry (suggested 24 hours).
  9. Mount the hanging bracket on the back, and hang it on the wall.  


There are several other versions of DIY sunburst mirrors online, using wood shims, paint stir sticks, kindling, and even an old wine barrel.  Each photo has a link below to the instructions for each mirror shown.


from jandjhome


January 25, 2012

I'm Going to Fashion Week!

Jason Wu runway image via Condo Blues

For the last couple years I've been reading about design bloggers going to New York City for Fashion Week courtesy of Brizo Faucets, and I've been jealous.  A glamorous all-expense-paid trip full of fashion, design, and a LOT of talent?  Who wouldn't be jealous of that?  Well, guess what?  In a couple short weeks, I'm going!  Thanks to the recommendation of Paul Anater over at Kitchen and Residential Design, Brizo has invited me to be one of the 20 designers/architects/bloggers attending Spring 2012 Fashion Week.  In googling around a bit, I've discovered the names & profiles of some of the other guests, and I have to say I'm truly humbled.  I'm going to be surrounded by some incredibly talented and successful people, and I can't wait to soak it all in.  I realize I'm likely a last-minute add-on, but I just don't care.   To be associated with this group of people in any way at all is flattering beyond belief.


Floriano, image via www.brizo.com


This is such a great opportunity, and though Brizo is paying for the whole thing, they are NOT buying my support.  I've always loved their product and their philosophy.  I was first introduced to Brizo back in DC, and I immediately loved the Floriano faucet, simply because it was so different.  (In fact, I bought it for my own home as soon as I had the chance.)  I wish I could find the brochure from that time, because I distinctly remember the marketing literature featuring fabrics with this faucet design, and fashion mixed with faucets throughout the piece.  Since then Brizo has expanded beyond brochures, and they've partnered with designer Jason Wu.


images via www.brizo.com

Brizo sponsors Jason Wu's runway show at Fashion Week, and Jason Wu designs collections for Brizo.   Design is art, regardless of the medium, and I think that's represented perfectly in this relationship.

image via www.brizo.com

And now I get to see it all in person.  Wow!

image via www.brizo.com

I'll have a lot to share with you all in a few weeks after what will have been an amazing experience!

January 17, 2012

Modern Master Suite Remodel


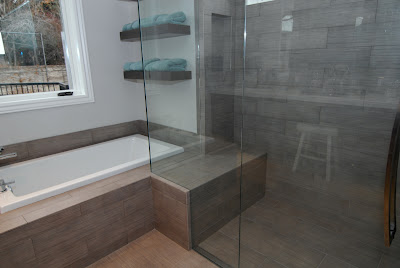
I am so fortunate to have have been called to work on this project, because I FINALLY got the chance to use Walker Zanger’s Skyline Blend tile (a tile many of us designers drool over).  Not only did I get to use this tile, I got to do an ENTIRE wall of it.  AND I got to specify 3-form, AND a linear drain, AND beautiful linear gray tile, AND amazing light fixtures, AND beautiful faucets.  And to top it all off, the clients are the nicest people you’ve ever met (and their kids are adorable!).

The previous bathroom was nice, in a high-end spec home kind of way.  But the closets were too small, the designated tub area was way too big, and the finishes didn’t have a lot of personality.  My stylish clients (seriously, they have great tastes) wanted a larger closet, and a bathroom more fitting to their daily needs.


They began the process with architect Hans Hoffman, who gave them a few great options for reconfiguring the master suite.  Then they consulted with a few contractors, including Bruce Anderson from Blue Willow Builders.  Bruce suggested that they call me to help with the details and finishes.  From there we tweaked a few things in the layout to maximize space in the bathroom and closet, and after a lot of work to make everything fit (without an inch to spare!) the clients now have a wonderful suite that looks AMAZING!


There are so many great things about this bathroom and I just don’t have time to write about all of them, so a bunch of pretty pictures will have to suffice.  But PLEASE ask if you’re curious about any of the specific products or anything else in this remodel.


January 5, 2012

Island Shapes

I'm working with a new client on a kitchen remodel / reconfigure, which involves eliminating a hall closet and combining the current kitchen and informal eating spaces into one integrated room.  Because this is a non-rectangular room, we need to use an asymmetrical island shape in order to maximize countertop, storage, and seating.  I've put together these images from houzz.com for my client, showing different island shapes, variations of which would work well in this particular kitchen.  (Note this slideshow is only exploring island shapes, not kitchen styles.)