December 29, 2011

Basement Remodel with Master Suite


We are nearly finished with a great project that involved reconfiguring and refinishing a basement in order to give the clients a Master Suite, and I thought it would be fun to give a recap of the design & selections process we went through.

Moving walls, especially in a basement, can be a challenge, as these walls may  be load-bearing, and they will likely contain plumbing lines, electrical wires, and HVAC ducts that feed the basement as well as the upstairs floor(s).

This basement we started with was likely an old DIY finishing project. (This was not the work of my clients - they bought the house this way!).  It presented a lot of these structural and mechanical challenges, as mentioned above, along with some interesting and unexpected construction methods (as we often see with DIY projects) that made the demolition and prep phases even more challenging.

Old Plan:

The old configuration had 2 bathrooms (one of which was a very odd layout, as the bathroom was open to the adjacent den-type space, and the toilet was tucked beneath the stairs).  The open room that the bathroom was in had no connection to the rooms in the back of the basement, except through the laundry room.  This back space included a kitchenette, the other bathroom, and 2 small awkward rooms.

I worked with Drew & Mike of ReVive Remodeling to determine which walls we could move and how everything could be re-routed & relocated.

We left the laundry and mechanical rooms where they were, but reconfigured everything else to include:

  • Den/Office
  • Bedroom
  • Bathroom
  • Large Master Closet


New Plan:

The bathroom itself is a very unique layout.  We didn't have the luxury of space for a large bathroom with separate toilet room, so we created a niche for the toilet behind the shower.  Not only does this give the clients privacy, but it also allowed the toilet to remain in the existing plumbing location, which saves money.

Selections:
I started with this (very sketchy) sketch to propose a look for bathroom sink wall.

The concept was based on the clients' need for storage, their love of concrete and that "rustic modern" look, and their desire for 2 sinks (which they didn't really have a lot of space for).  Fortunately, the clients loved it, and so from there I worked with them to finalize finishes.  Below is one collage photo and paint samples, and you can see more on this previous post.


The conceptual sketch and material selections led to construction drawings and elevations.

And now, the project is nearly finished!  There are still a few remaining punch-list items to be taken care of, but the bathroom looks so good that I just couldn't wait to post these photos.  Please note that one of the final items is adding wood trim around the mirror, which will be the perfect finishing touch.


Check out the sliding shower door!


Aside from the clients being really cool people with great tastes, I got to work with a lot of other talented people on this project:
I'm lucky to have been a part of this project!


December 23, 2011

Happy Holidays from enzy design!


This year has been an adventure!  A few months ago, I decided it was time to dedicate 100% of my focus to enzy design, so I took the leap.  I quit my day job, and moved into my home office.  It's been an exciting yet scary transition, and I have all of YOU to thank.  I've relied heavily on my husband, friends, family, colleagues, blog readers, and clients for their support.  Without that extra encouragement, I'm not sure I could have done it.

I'm fortunate to have a client base already built up, and I've been reasonably busy from the beginning, which is not typical for a business that's just getting started, especially in this economy.  Having enzy as my side business over the last 3 years has made a big difference, and I'm so glad I've planned for this slow growth (and therefore lower risk), rather than diving into deep water with no idea what to expect.

I strongly believe that I am a better and more successful designer because of the communities I am a part of (local networking groups, trade associations, and the many many online and blogging communities).  These communities keep me connected to the design industry, and they also introduce me to peers within my industry.  I am so fortunate to have met all the wonderful people I now know because of these connections.

Small businesses have a much better chance at making a difference if they work together to make a larger impact than one person could do on their own, and we all have so much we can learn from each other.  Through the upcoming year(s), I will continue to make these communities a priority, because I know that I receive back much more than I give, and I am extremely grateful for that.

I'm looking forward to what the next year will bring, and I wish all of you the feeling of excitement and optimism that I'm experiencing right now.

Happy Holidays!

Love to all of you,
Nicole


December 22, 2011

Holiday Gift: Homemade Kahlua


This year some of my colleagues / clients are getting homemade kahlua for the holidays.  I freely admit that I stole this entire idea from my wonderful friend Jen, who has given us this treat for the last couple years.

I found several recipes online, and I was surprised that each recipe was unique.  Measurements and ingredients varied a lot.  Some used brown sugar, while others used white sugar.  Some used just vodka, while others used vodka and brandy or just everclear.  Some used vanilla beans, and others used vanilla extract.  Many used instant coffee, but I preferred to use good quality brewed coffee.  I started narrowing down the recipes to just those with brewed coffee, and I ended up mixing a few of these, along with Jen's advice, to come up with my own.


Here's my recipe:
(Makes ±7 Liters)

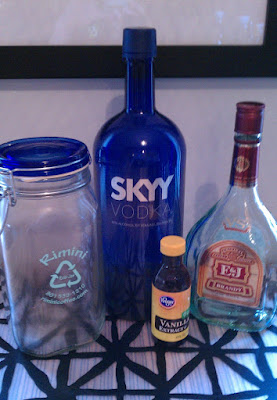
  • 24 cups brewed coffee, using freshly ground espresso beans roasted locally by Rimini.
  • 1 - 5-lb. bag of sugar (approx 10 cups)
  • 1 - 1.75 L bottle of Skyy Vodka
  • 1 - 750mL bottle of E&J Brandy
  • 8 Tbsp. pure vanilla extract

Brew coffee.  Add sugar & stir until it dissolves.  Allow to cool to room temperature.  Add vodka, brandy, and vanilla.  Bottle, label, and if possible allow it to sit for at least 2 weeks in a cool dark place.  (I didn't plan ahead enough, so unfortunately the recipients are being advised to wait a bit before opening.)

For my bottles, I used these SLOM bottles from Ikea.  And for the labels, I downloaded a template from Avery for their 2"x4" shipping labels (#5263), and I created my own using this fun (and free) pattern from Sprik Space as the background.


Have you all made your own kahlua before?  What's your experience, and what recipe have you used?  I'd love to hear about it!


December 14, 2011

Modern Bathroom Remodel


Recently I posted about a beautiful white & wenge kitchen remodel I was lucky to be a part of.  Well, at the same time, we did the bathroom, which included a closet.  And that's gorgeous too!


The same wonderful group of people was involved in this project:  Cody Beal, Lew Shurtliff, Adam Erickson, and others.  Cabinetry by Hallmark Cabinets.

December 5, 2011

Our DIY Wedding

photo by Lovejoy Imaging

This is not my usual type of blog post, but as I mentioned when I showed you our wedding inspiration photos, designing a wedding is similar in many ways to designing interiors.  So I'm taking this opportunity to show off our September wedding.

And let me begin by saying this may be better called a "DIYFF" wedding... "do it yourself, with friends & family", because we could never have pulled this off without the help of friends & family.

We had a small budget and wanted to keep things simple.  We both love being outdoors, and we both love City Creek Canyon, which is near our home in Salt Lake City, Utah.  I often bike and walk up the canyon, and every time I do so I can't get over how lucky I am to live in such a beautiful place.  We wanted to get married somewhere special to us, and somewhere that would show our out-of-town guests what we love about where we live, yet we didn't want them to have to drive for hours, after their already long flights, for this experience.  So we were thrilled to find out we could rent this picnic pavilion at the top of the canyon for a mere $75.  (Note:  The site does not have electricity, and the restrooms are pit toilets, so if you're not comfortable with that, then this is not the site for you.  We provided air freshener, hand wipes, and hand sanitizer by the toilets for all our guests.)


The natural setting is amazing, so we didn't need to do much to dress it up.  

Inside the Pavilion:

We reused the existing picnic tables, rather than dealing with the expense and set-up concerns that come with table and chair rentals.


We bought loose-hanging fabric from a discount bin to hang at the end of the "aisle", where the ceremony took place.  

We found inexpensive white-on-white damask flannel-backed vinyl, sold by the yard (at walmart of all places!) to use for tablecloths.


We hung paper lanterns (best price was from luna bazaar).


We placed bunches of white carnations, mixed with potted succulents, and additional pots of green flower bunches (spider mums, fuji mums, green hypericum, etc.) which I unfortunately don't have photos of.  Eliminating the florist (along with my account with the local wholesale supply) was great for our budget, though we couldn't have done it without help from my talented girlfriends.

The succulent pots are the smaller Celeber pots from Ikea, at $2 each (which I believe are now discontinued).   For the succulents themselves, I purchased a few pots of succulents from a local nursery about 6 weeks before the wedding.  We separated and re-potted them ourselves, which saved a lot of money.

We also added simple tea lights (from Ikea) to fill some of the empty space.  


Food & Drinks:

Food was one thing we didn't want to skimp on.  My husband and his family are big foodies, and we wanted something special, not just a basic picnic meal.  Since logistics (and budget) didn't work well for having food service at the site, we created a "gourmet picnic" style menu.  We worked with Romina Rasmussen at Les Madeleines for a unique and tasty (yet practical) menu that allowed her to pre-package everything at her cafe.  This was definitely NOT your basic picnic!

Food was served in picnic boxes - we bought the natural kraft boxes online and printed our own labels for the guests.  (See that great n&m monogram, designed by our talented friend Robyn?)


The contents of each picnic box included gazpacho with shrimp, Israeli couscous salad, wild mushroom wraps, and a brioche roll.  It was amazing!  (Note that all containers and cups were either biodegradable or recyclable, so we didn't feel bad about all the packaging.)


Les Madeleines provided the cupcakes as well.  Simple, natural, and delicious! (shown with green carnations and spider mums)


The drinks were chilled in the river running by the site.


We rented galvanized bins from Robinson Event Rentals, and served locally brewed beer from Bohemian Brewery.


Lavender Lemonade, also from Les Madeleines.


Ambiance:

The setting really speaks for itself, but we wanted to emphasize that this was more than just a picnic, so we got a band to set the mood.  We were lucky to find a gypsy jazz band called The Hot Club of Zion.  These guys are fantastic - check them out here.


Accessories:

I loved looking for these little details to add that extra special touch.

My DIY bouquet... I just provided the parts, and my wonderful girlfriends put it all together.  I loved it!  Includes white ronunculus, white hydrangea, white roses, and 2 succulents.


My sister's / maid-of-honor's bouquet:  A smaller version of mine.


My necklace, by local jewelry artist Elizabeth Plumb, bought at the Downtown Farmer's Market.


My hair, done by my talented cousin.  No, she's not even a hairdresser, she's a dental hygienist!


I originally bought this vintage silk flower piece for my hair, but decided the colors didn't work so well.  It worked great as an accessory for my sister's bridesmaid's dress.  Flower from etsy's Flora & Fauna.  Her necklace was custom made using silver leafs and champagne crystals by local artist Katie Waltman.  (My bracelet is also by Katie Waltman.)


We custom-designed Mike's ring.  It's titanium with an offset mokume-gane insert. Made by Stonebrook Jewelry, a Utah jewelry we found on etsy.


Our guest book, a simple journal from Barnes & Noble.  "Life is not measured by the number of breaths we take, but by the number of moments that take our breath away."  

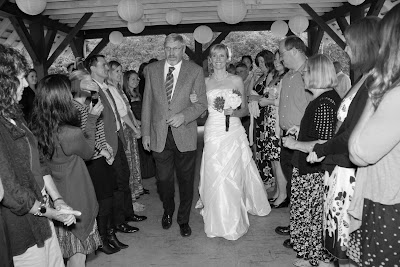
Add another breath-taking moment to my count... our wedding was perfect and I'll never forget how it felt walking down the aisle in that beautiful place with our amazing friends & family right there with us.


Special thanks to our photographer, Matt Lovejoy, of Lovejoy Imaging!


November 23, 2011

elume distinctive lighting showroom


I recently had the chance to design the wet bar for the glamorous new elume distinctive lighting showroom in Park City.  I love the mix of stark white with the natural grain of walnut, and was thrilled to be given free range to use these materials here.

I basically had these limitations:

1.  It had to fit in this space:
(This is the measure I did using the Measures app on my ipad.  Highly recommended app!)

2.  It had to accommodate the existing Sub-Zero, plus a new wine cooler, sink, and dishwasher drawer.

3.  It had to look good.

A few more photos of the results:


The "ladies of elume" have great tastes, and it was fun working with them on this project!

Specifications:
Cabinetry:  Horizontal grain walnut, by Riverwoods Mill.
Countertop:  Nanoglass, by J2 Design
Tile:  Modwalls Viridian Ocean