October 31, 2012

Black Rooms

In honor of Halloween, I wanted to post some photos of black rooms.  Take a look and be as inspired as I am... using black is definitely bold, but it isn't as scary as you might think!
by Atmosphere Interior Design via decoist.com

by Kelly Wearstler via Elle Decor

By Christian May of Maison21


Home of Andrew Corrie and Harriet Maxwell via remodelista


Work of designer Carrie Hayden of Great Jones Home based in Seattle

Happy Halloween!

October 12, 2012

A Modern Midwest Kitchen

photo credit: renee j. photography

Last year I designed and supplied the cabinetry for the kitchen (and other rooms) in a new lake-front home in Michigan.  A clean contemporary home, with crisp lines and bold contrast, yet just enough warmth to keep it cozy during those cold, grey Michigan winters that I grew up with.

There are some incredible photos here taken by renee j. photography, filled in with some of my own not-quite-so-incredible photos to show more viewpoints.

(my photo)

We used cherry cabinetry with an espresso finish, white quartz countertops, white glass tile, and aluminum with white glass accents in the upper cabinet doors.

(my photo)

photo credit: renee j. photography

I think many kitchen designers will agree with me that microwave drawers are a lifesaver when it comes to kitchen design aesthetics.
photo credit: renee j. photography

Here's a close-up (though not high quality) photo of the bar area, where we created a custom wine rack with a 3-form tip-up door above.
(my photo)

photo credit: renee j. photography

Architect:  Visbeen Associates
Cabinetry:  RiverWoods Mill

September 27, 2012

What do Dwell Magazine and I have in Common?

We can't get enough mid-century modern, and we both LOVE the Green Ant!

The October Issue of Dwell Magazine features my favorite local furniture store in an article called "Utah Bound".  Local blogger Creede Fitch, of Grassroots Modern, writes about the somewhat unknown history of Mid-Century Modern in Salt Lake City and the influence of such architects as Taylor Woolley and John Sugden on local modern architecture.


But back to the store... the Green Ant.  Ron Greene has done a great job with this amazing collection of Mid-Century Modern furniture, all at surprisingly affordable prices compared to what you might find in other markets.  I love walking in there whenever I have a chance, and often Ron is there, eager to talk with my husband & I about the pieces we have and are working on restoring (like our PK-22 chairs that are STILL works in progress).

Since I've been lucky to marry into a family that has given us some amazing Mid-Century pieces, we unfortunately just don't have room for any more furniture in our home.  So we had to settle for buying a little statement piece from the Green Ant, just because.  It's a silly thing, really, as we have no idea where it came from or what it was, but that's why we like it.  It has a story.  Plus it's the perfect splash of color for the dining room.  And when the time comes for new accessories, guess where we'll go first?


And in case you're wondering, this wonderful sideboard (and the Eames dining chairs) are some of the pieces from my husband's family.  


September 20, 2012

Let's Talk More About White Refrigerators

I recently posted about the Whirlpool Ice collection, featured in the House Beautiful 2012 Kitchen of the Year.  And then I thought I had the chance to use these appliances for a project, but unfortunately their limited models available in this finish did not include a slide-in range, convection microwave, or a cabinet-depth bottom-drawer refrigerator.  I understand that they can't offer everything in this finish until they get a better sense of how it might sell, but I am pretty surprised they don't offer the slide-in range.  (Whirlpool noted my comments on Twitter and said they'd pass my input on to the powers that be, so that's nice.)

In this quest for white appliances that don't look like they belong in a rental apartment, I've been surprised how few options there are, especially considering how easy it would be to just add that extra touch of style.  Even just replacing the standard white handle with a stainless or chrome handle (or perhaps even brass?!?) would make a huge difference!

Here are a few of the refrigerator options I've found.  If you know of others PLEASE let me know!

The 2 models from Whirlpool Ice:


AGA has a good option, with a vintage flair:


And I just discovered this new Retropolitan model by Big Chill:

And then there's this Fisher & Paykel model, which I thought wad discontinued but just found it on their website.  It may not look as stylish as the models featured above, BUT it was a great space-saving option at a fraction of the price of the others.  I used this refrigerator several times in smaller kitchen remodels, both in white and stainless.


And another Fisher & Paykel model that I hadn't seen before, and may love even more!  Note that both these Fisher & Paykel units are just under 33"wide.


Do you have other stylish white refrigerator models that I might be missing???  If so, please share!


September 10, 2012

Get that Kitchen out of the Corner!


Have you heard the saying "The kitchen is the heart of the home"?  Chances are, if you are in any way connected to the world of kitchen design, the answer is yes.  And while that is true, I'd like to argue that the statement "The kitchen is the hub of the home" may be even more fitting when it comes to truly functional kitchen design.

We usually see kitchens in a corner of the home... which accommodates the standard U-shape or L-shape layout well and usually allows the kitchen to be adjacent to 2 other activity areas.

But think about how you use your kitchen.  Doesn't it make sense that your kitchen be closer to many activity areas in your home?  Enter the idea of the kitchen as a centrally located hub, like on a wheel.  And imagine all the "spokes" that could extend from that central kitchen.  A kitchen located in the center of the home, if planned correctly, could allow you to be equally connected to all of these separate spaces (and more):

  • Dining Room
  • Family Room
  • Pantry / Butler's Pantry
  • Mud Room
  • Exterior Door (for carrying groceries in)
  • Bedrooms (easy access to morning coffee)
  • Office space (where kids might be doing homework)
  • Laundry Room
  • Separate bar area (for entertaining, keeping traffic out of the main working kitchen)
Note the kitchen rendering above.  I proposed moving this kitchen out of the corner, and doing so makes it so much more accessible from all over the home.

This isn't always possible in a remodel situation, but is a definitely possibility if planning a new home, and I strongly encourage it.


For more information, read this article and this article by Ellen Cheever.

August 27, 2012

Guest Post: Water-Saving Fixtures - What to Look For


Thanks to 3 Mountains Plumbing, in Portland, Oregon for this informative guest post!

The term water saving is no longer synonymous with “no pressure” or “personally inefficient.” As
advancing technologies make eco-consciousness an increasingly integral part of life, water-saving
bathroom fixtures can now reduce your environmental impact – and your utility bills – without
sacrificing comfort or convenience. The latest advances in water-efficient plumbing are not only highly
functional but beautiful when it counts.

The next time you’re in the market for water-saving fixtures, keep the following in mind:

Low-Flow Toilets

The toilets of yesterday flushed up to 5 gallons of water, but that changed in the 1990s when models
were designed to flush no more than 1.6 gallons of water. The first generations of low-flow toilets were
ineffective, however, much to consumer disappointment.

Today’s low-flow toilets employ new design features to help reduce friction and help waste make its
way out of the bowl. Such features include glazed trapways; 3-inch flush valves; and in some cases
pressurized air in the tank to help enhance the force of the water moving into the bowl. When shopping
for a low-flow toilet, look for one that has a dual-flush option, which allows you to control the amount
of water you flush based on the type of waste. Today’s standard low-flow toilet has a 1.28-gallon-per-
flush rating, and the dual flush ratings go as low as .6 gallons per flush for the ‘liquid only’ option. With
the right low-flow toilet, you can save up to $100 per year in utility costs.


Programmable Showers

A revolution in plumbing, programmable showers allow you to set your ideal water temperature,
delivery method and flow level. This prevents you from wasting water as you adjust the valves to find
the perfect temperature. When shopping for a programmable shower, look for one that’s backed by a
state or national green building standards code and allows you to save multiple user presets.

Flow-Optimized Faucet Aerators (and Shower Heads)

The latest flow-optimized faucet aerators help save water without sacrificing pressure. The air that’s
injected into the flow of water reduces the flow rate from 2.2 gallons per minute to 1.5 gallons per
minute, while maintaining optimal pressure. Depending on the aerating model you purchase, you can
cut back on your water use from a single bathroom tap by up to 32 percent.

The good news for homeowners is that a luxury bathroom no longer has to be a wasteful one. Consult
your local plumber about the latest water-saving bathroom fixtures to learn which would work best in
your home.

 3 Mountains Plumbing, servicing all of the Portland metro area, is a fully licensed and bonded plumbing contractor that specializes in Service Plumbing and Remodeling Plumbing for homes and businesses. 

August 14, 2012

TV Wall and a Floating Shelf


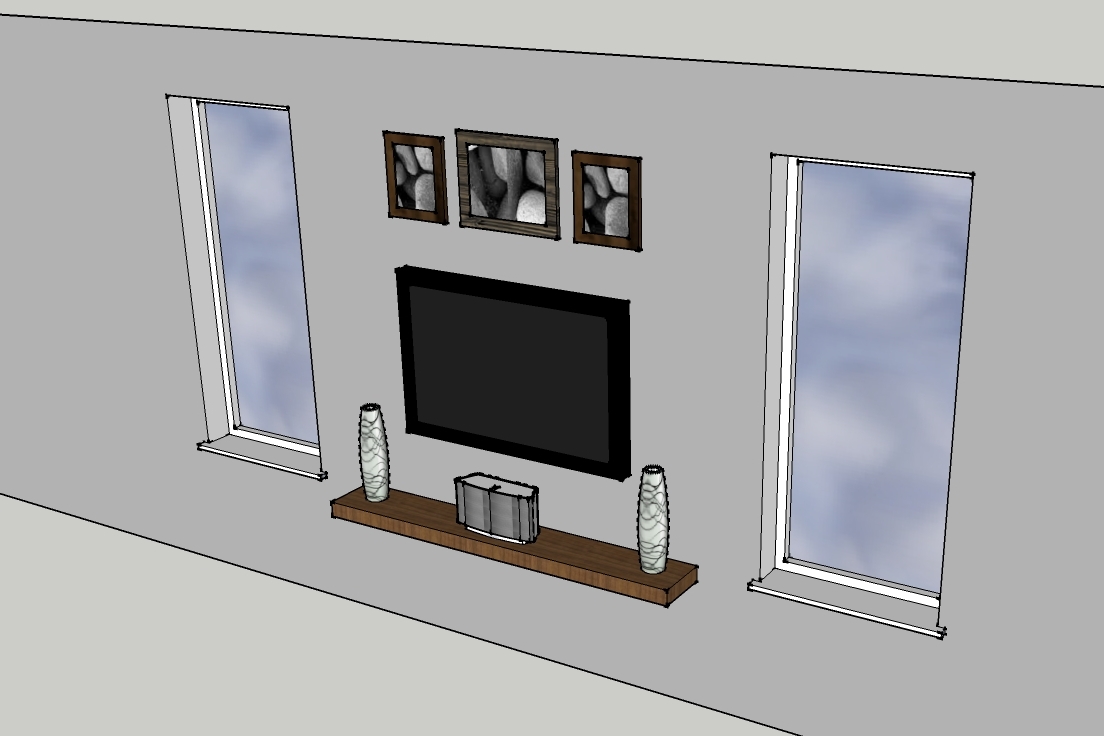
I confess, we are one of those couples whose dining table is their coffee table.  We have a real dining room, with a wonderful dining table, but we never eat there.    We eat in front of the TV.  Though it's not ideal, after a long day of work, sometimes all you really want is to sit together, with no need for conversation.  Because of this, I was really sick of staring at everything around the TV - which included the cheap TV stand I bought years ago when I got my studio apartment (sans doors, as they had fallen off after all the moving around), as well as tons of cords for the speaker / tv / media system.  So,when most women ask for jewelry and clothing etc for their birthdays, I asked that we spend time remodeling this wall.  The project began in March, and we finally finished enough to post pics this past weekend.

I hated the previous setup so much that I didn't even take before photos, so instead I'll show you a photo from our last holiday party, where the ugly TV cabinet is in the background of all my super friends in their fun "recycled" holiday attire.


The ugly cabinet went straight to the curb (where we can always count on someone to come by to pick up old stuff).  

I drew everything exactly as I wanted it on SketchUp, and my wonderful husband did the rest. 


He spent hours researching the right components, and then more hours in the attic running the necessary cables from the TV location to the new component location (above the basement stairs).  He also cut new speakers into the wall per my dimensions.  (And would you believe the holes were correct and required no drywall patching?!?)

The main glitch was actually the install of the floating shelf.  Our first attempt didn't work.  We did some more research, and figured out a different approach, which worked perfectly.

While still looking for a center channel speaker (trying to find something that's not just boring, boxy, and black) as well as some decorative accessories for the shelf, we're close enough to done so I wanted to share.


And for those of you who might want to know more about hanging the floating shelf, here's what we did:

The shelf has a 1" hollow space in the back.

My husband used wood-glue to glue (2) 1/2" pieces of wood together for cleats.  Then he used a pocket-hole jig to pre-drill holes.

Used a stud-finder to make sure we were drilling into something solid.
Mounted the first cleat on the wall.

Note the line above (drawn before cleat was mounted) to keep cleat level.

Used the level for the remaining cleats (starting with outside first and working our way in).  I was asked to point out that the level was standing upright for actual leveling... here he was just using it for the straight edge.

Once the cleats were installed, the shelf slid perfectly into place!